Tuesday, 31 October 2017

Game progress- construct 2

To enable the character walk smoothly on platform, make sure to double click on the platform and set the to the bounding box.


There is also cropping option to remove unwanted transparency layer.


To add snow effect, first draw the snow in AI (1 round white image). Double click on the screen, and add particles. Inside the properties, edit the speed=10, size=1, opacity=100, X randomizer=220, speed randomizer=10,  size randomizer=10, acceleration=1,gravity=5, angle randomizer=100, speed randomizer=10, opacity randomizer=5, destroy mode= timout expired and timeout=20.

Game progress

Since the colour for tiles not well blend, the designer decides to change the colour of tile.


Adding sine behaviour to the one of the platform with horizontal movement and period of 10 with magnitude 150.

Monday, 30 October 2017

Movement of clouds in construct 2 - game progress

To make the clouds move from right to left, add behaviours: bullet and wrap (to make the cloud to reappear on other side).
Bullet speed was set to -30.
Wrap set to viewport.


Sunday, 29 October 2017

Game design and coding progress in Construct 2.

Rename the default into stand for 'front view'. Add new animation and rename it with 'walk'.


Import frames from file for walking animation. Set the loop to yes. Close the tab.

Right click twice on layout, and click on keyboard to set the gameplay with keyboard.

Go to event sheet and click on add event and then character.

Click on 'Platform on moved'.

Click on add action and then character.


Click 'set animation'.

Set the animation on 'walk' (for platform on moved).

Now, add new event and click on 'platform on stopped'.

Click the add action and set the animation to 'stand'.


Event 'Platform on landed' was set to 'stand' action as well.

Event 'platform is moving' was set to 'walk' action.


Copy the above layer (platform is moving' Control+C) and pasted below (Control +V). Now click on 'platform is moving' and click on 'Invert'.


Change the action for event 'invert platform is moving' to 'stand'.

Set the animation for jump, and do the same for event 'platform on jump' and add action (animation- jump).

Add event and press on keyboard.

Click on 'on key pressed'.

Press on left arrow and click done.

Add action - character - set mirrored.

For right arrow- character- set not mirrored.

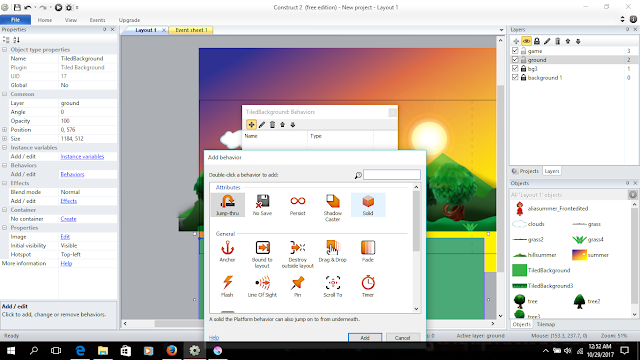
In game layer, add platforms and add behaviour 'jumpthru'.


Click on character.

Add behaviour - scroll to. (to enable the character to scroll through the game with background moving.)

Click on background layer and change parallex value to (0,0).


Level 1 progress so far:
The ground, platforms and tree layer is kept added on since the background layer was set to 0,0 (permanent). This allows the trees to move with character.


Game design progress using Construct 2.

Open a new empty project.


Set the layout size.


Create a layer with background name, and insert the png pictures that illutrated earlier.


Different layers are added.


Now make a layer for ground, and left click twice on layout to open the insert new object tab. Select tiled background and click on it. Insert the ground through this method.


After that, click on ground, and the click on add behavior at the left side. Click on add button and click solid.


Now, make a new layer and rename it game. Inside this layer, add character front view.

Add behavior > platform to the character.

Right click on character and edit animation.


Click 'set collision polygon, and right click on character and 'set it to bounding box'.

Shooting video using object to determine time for animation


Saturday, 28 October 2017

Rendering- Smoothing with mental ray

Install mental ray plug-in for the Autodesk Maya 2016.

Go to setting/preference, and click plug-in manager.


Find the file: mayatomr.mll and click autoload.


Now go to render using: mental ray. Alter any settings in render setting for example: quality.


Render a preview and save it as JPEG. file.

Result of rendering:


Adding skeleton for the mesh

Go to rendering setting and click on skeleton, and human template skeleton was chosen. The existing skeleton can be scaled according to the mesh. The skeleton can be unparent and parent according to the need in edit menu.


After putting skeleton inside the mesh, choose skin, and bind skin to bind skeleton with mesh.